How to deploy change with OpsChain using GitHub Actions

In an earlier article, we explored the advantages of integrating OpsChain with GitHub Actions. Now, in this post, we provide step-by-step instructions on how to deploy a change from GitHub Actions using OpsChain.
We will be using the OpsChain GitHub Action available from the GitHub Marketplace.
Step 1 - Add secrets
Add the following secrets to your GitHub Repository or Organisation.
| Secret | Description |
|---|---|
OPSCHAIN_URL | URL used to access OpsChain |
OPSCHAIN_USERNAME | Username the Action will use to authenticate to OpsChain |
OPSCHAIN_PASSWORD | User credential the Action will use to authenticate to OpsChain |
OPSCHAIN_GITHUB_USERNAME | GitHub User that OpsChain will use to authenticate to GitHub |
OPSCHAIN_GITHUB_PAT | GitHub PAT that OpsChain will use to authenticate to GitHub |
Step 2 - Create workflow definition
Create a new GitHub workflow definition in .github/workflows/opschain.yaml. The workflow below details the jobs and steps to be executed, which encompass code checkout, installation of necessary tools (such as the OpsChain CLI), and the actual deployment actions using OpsChain GitHub Action.
name: Verify - OpsChain

on:
  schedule:
    # * is a special character in YAML so you have to quote this string
    # run the CI/CD Blue/Green (for sandbox) every weekday at 20:00 UTC
    - cron:  '0 20 * * 1,2,3,4,5'
  push:
     branches:
       - main
     paths:
       - "apps/**"
       - ".github/workflows/opschain.yaml"
       - ".opschain/**"
       - "actions*.rb"
       - "Gemfile"
       - "lib/**"
  workflow_dispatch:
    inputs:
      environment_code:
        type: choice
        description: Choose an environment
        required: true
        options:
          - sandbox
          - sbxblue
          - sbxgreen
          - doesnotexist

env:
  OPSCHAIN_ACTION: print_context
  OPSCHAIN_PROJECT_NAME: blueprint
  OPSCHAIN_REMOTE: origin

jobs:

  deploy-with-opschain:
    name: Run OpsChain using GitHub Actions
    runs-on: ubuntu-latest
    if: ${{ github.ref == 'refs/heads/main' }}
    timeout-minutes: 60
    environment:
      name: ${{ inputs.environment_code }}
    concurrency:
      group: ${{ github.workflow }}-${{ inputs.environment_code }}
      cancel-in-progress: false
    steps:
      - name: Checkout code
        uses: actions/checkout@v3

      - name: Install OpsChain CLI
        run: |
          mkdir -p /usr/local/bin
          curl -sSL https://github.com/LimePoint/opschain/releases/download/2023-10-24/opschain-linux \
               -o /usr/local/bin/opschain
          chmod 755 /usr/local/bin/opschain

      - name: Deploy with OpsChain
        uses: limepoint/opschain-github-action@v3
        with:
          opschain_apiBaseUrl: ${{ secrets.OPSCHAIN_URL }}
          opschain_username: ${{ secrets.OPSCHAIN_USERNAME }}
          opschain_password: ${{ secrets.OPSCHAIN_PASSWORD }}
          opschain_project: ${{ env.OPSCHAIN_PROJECT_NAME }}
          opschain_environment: ${{ inputs.environment_code }}
          opschain_git_remote: ${{ env.OPSCHAIN_REMOTE }}
          opschain_git_username: ${{ secrets.OPSCHAIN_GITHUB_USERNAME }}
          opschain_git_password: ${{ secrets.OPSCHAIN_GITHUB_PAT }}
          opschain_action: ${{ env.OPSCHAIN_ACTION }}
Step 3 - Trigger your GitHub workflow
With your workflow now defined, the next step is to activate it. This can be done in multiple ways, depending on your project's needs.
- Manually: You have the flexibility to manually trigger the workflow through GitHub's workflow dispatch event, which is ideal for deployments that require specific timing or manual oversight.
- Automatically: The workflow can be set to automatically execute upon certain conditions, such as new commits. This automatic triggering ensures that your deployment process is seamlessly integrated into your development cycle, reducing manual intervention and speeding up the release process.
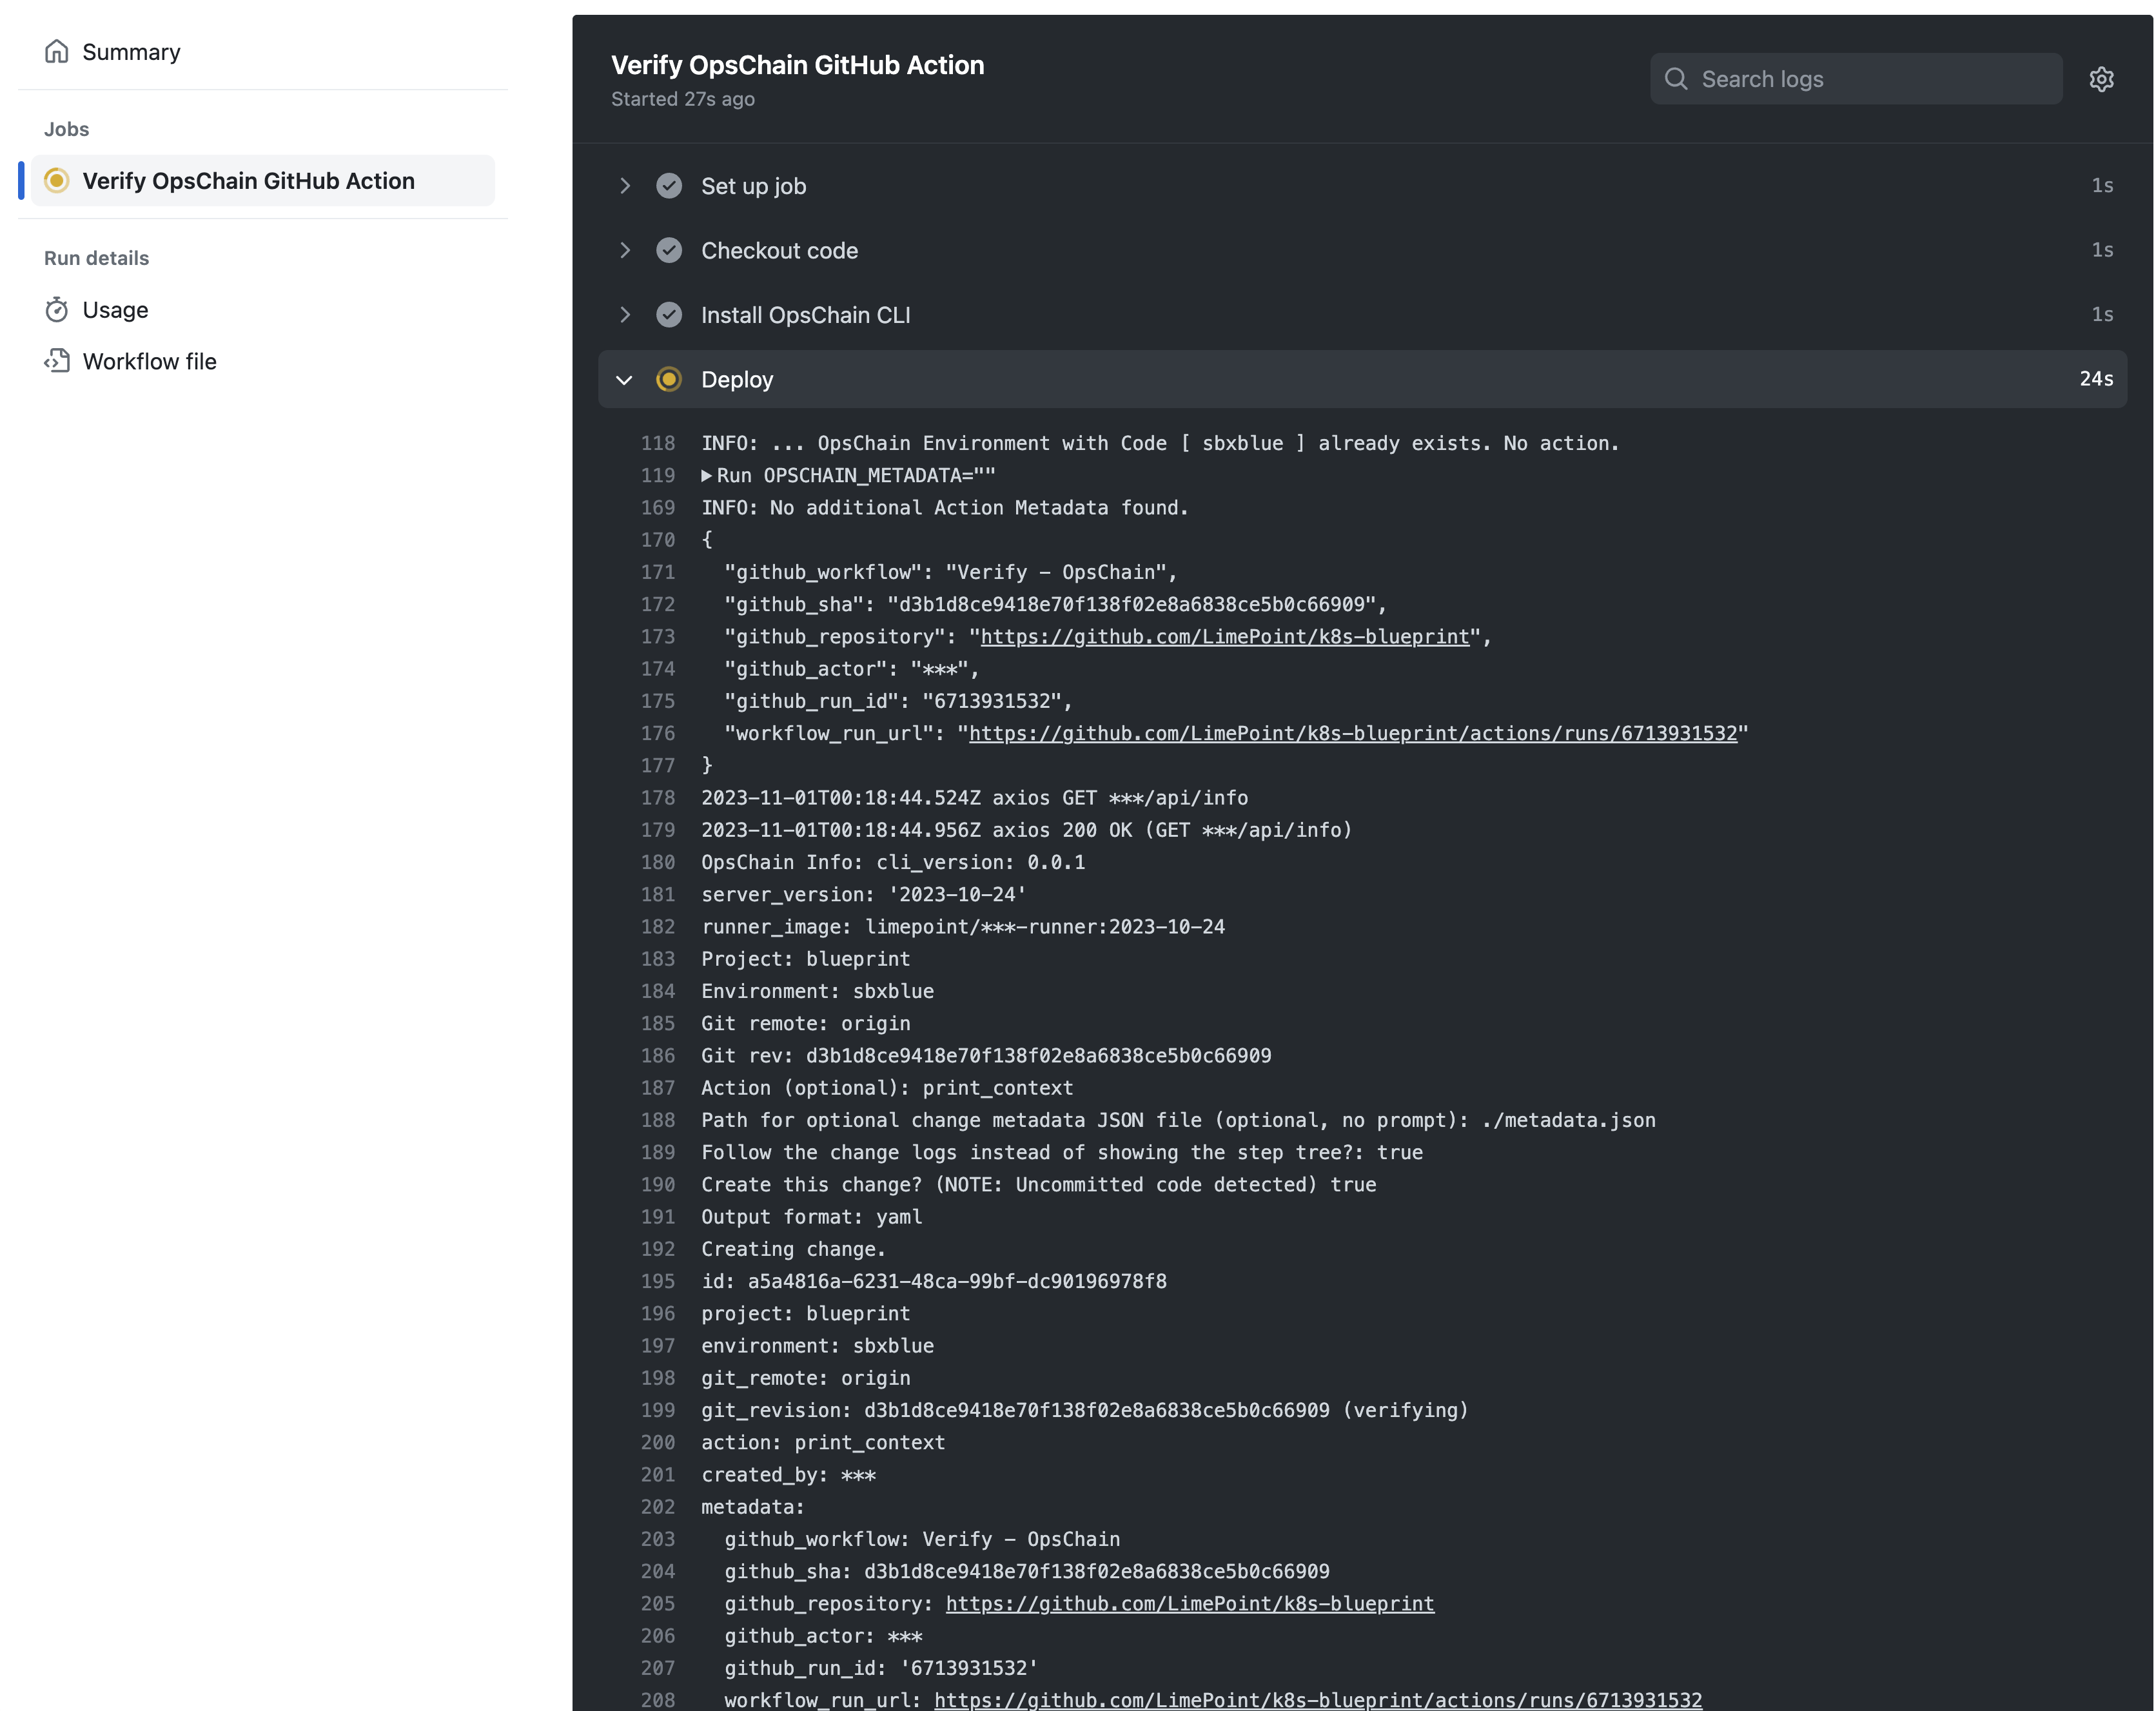
Step 4 - Inspect the GitHub workflow logs
Once activated, the next crucial step is monitoring its progress and outcome. This is where inspecting your GitHub workflow logs becomes invaluable. These logs provide a detailed account of the workflow's execution.
Step 5 - View your change in OpsChain
Once your GitHub Actions workflow has executed, you can now see the interaction within OpsChain.
OpsChain will give you a comprehensive view of the change that has been deployed. This step is more than just a confirmation; it's an opportunity to observe the direct impact of your workflow. In OpsChain, you can explore various details of the deployment, such as the change log, deployment status, and any related metadata. This not only assures you that the deployment has been successful but also provides valuable insights for future deployments, enhancing your continuous improvement in the CI/CD process.
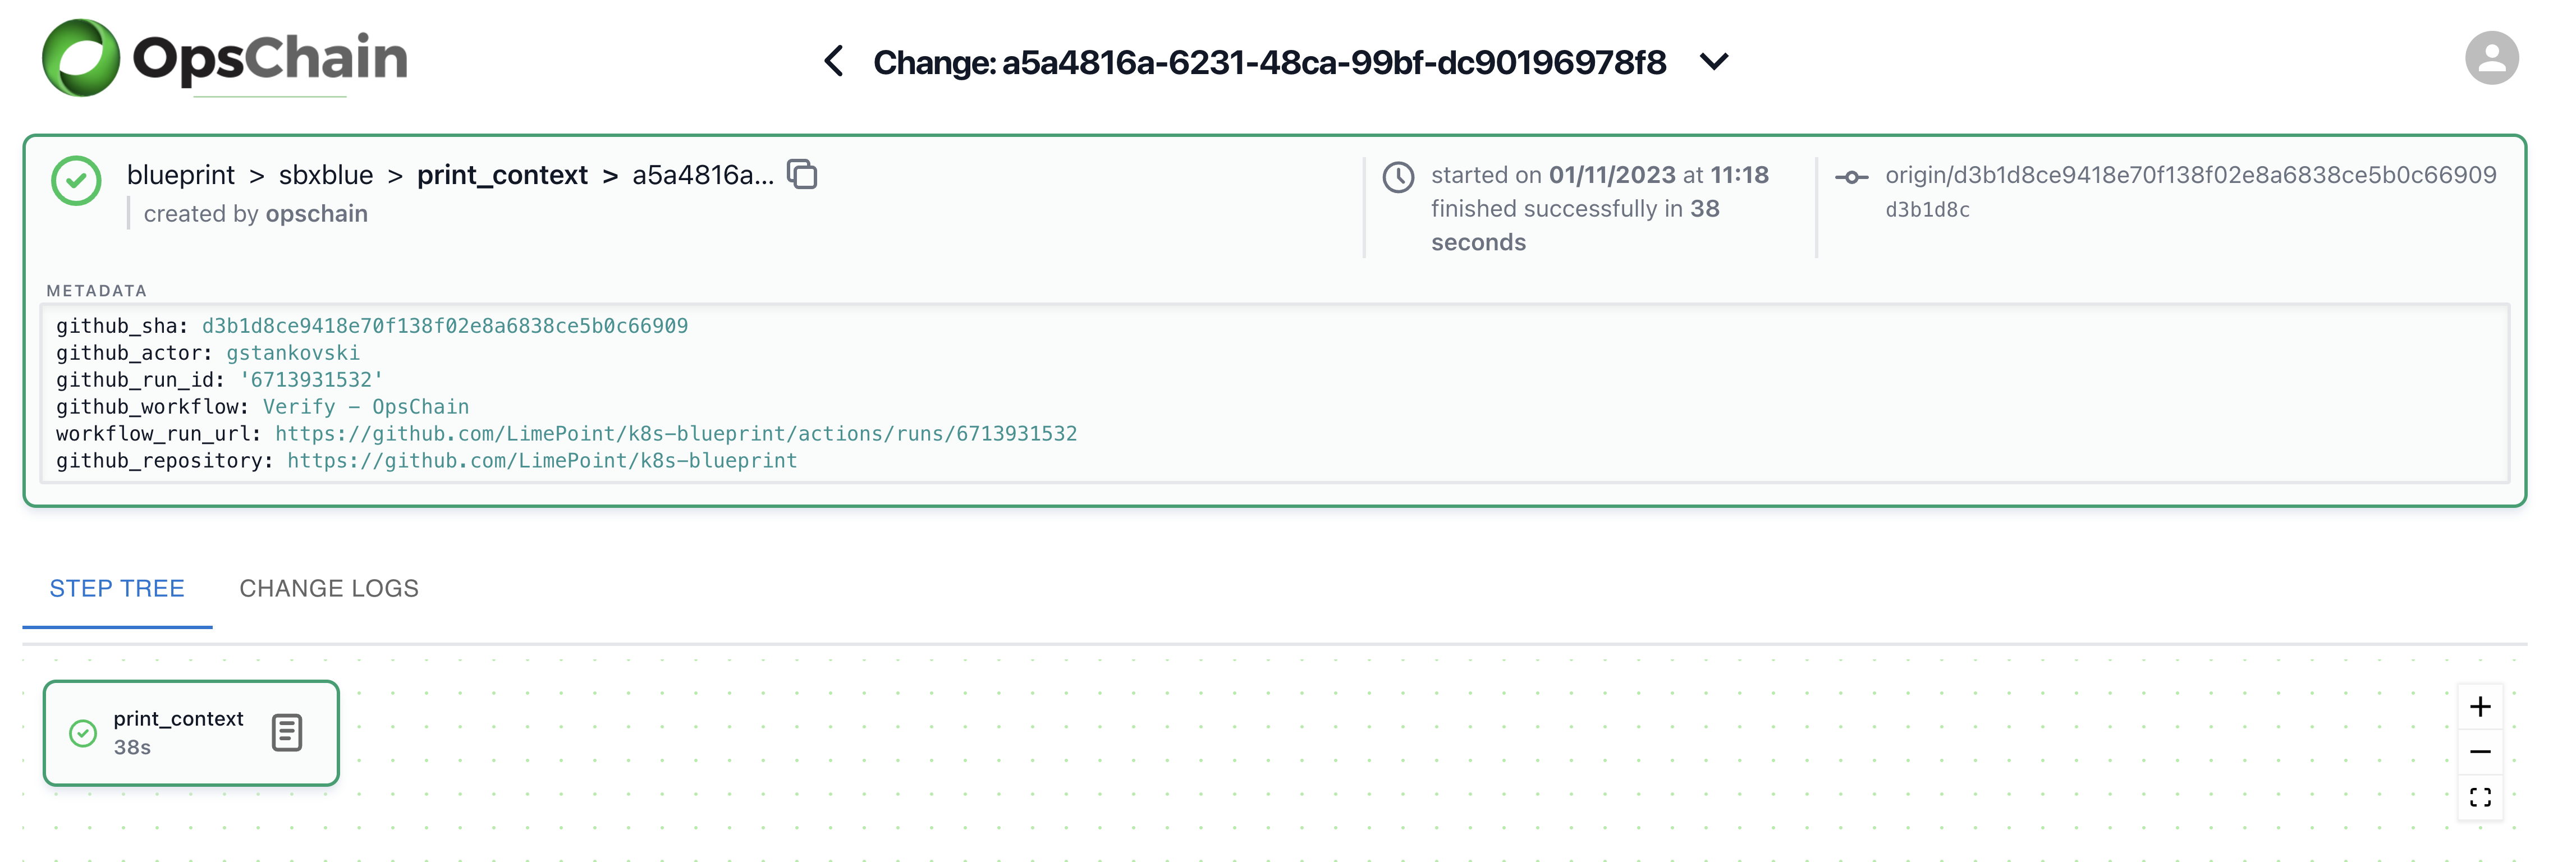
OpsChain will automatically capture the GitHub workflow details as metadata against the change.
Step 6 - View OpsChain change details
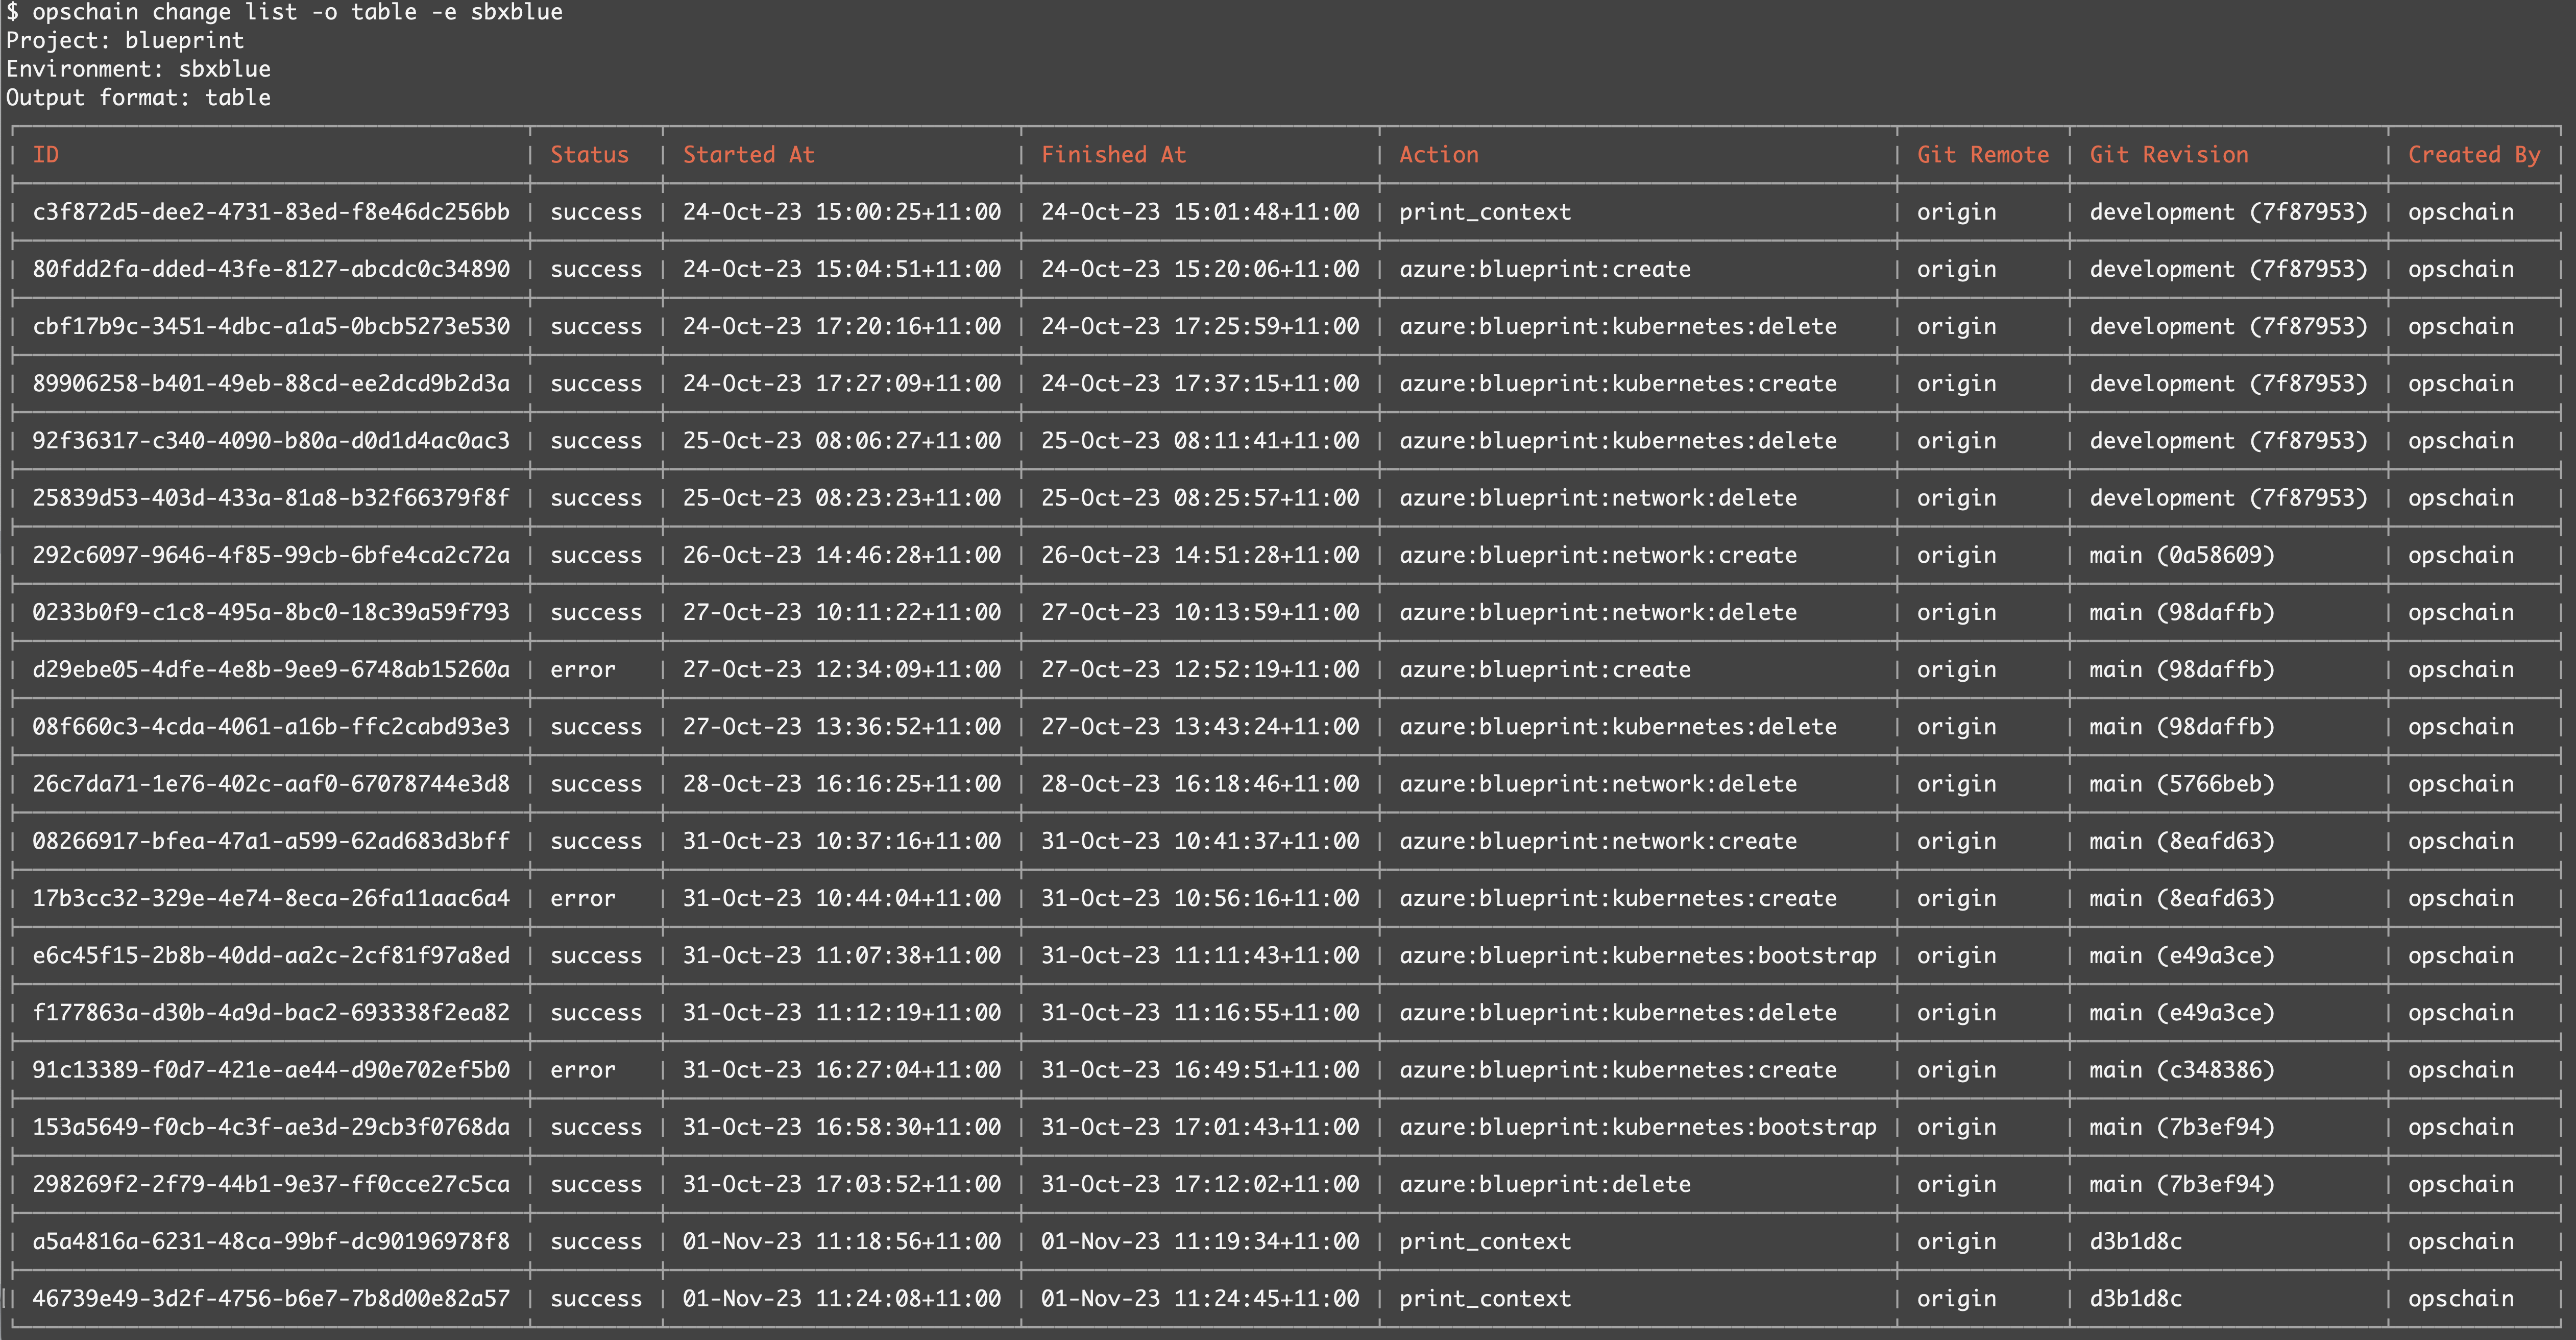
After observing the deployed change in OpsChain, the next step is to delve deeper into the specifics of the change. By using OpsChain CLI, you can access a comprehensive list of changes, along with their corresponding output logs. This detailed examination is pivotal for understanding the exact nature of the changes made. Furthermore, the change details in OpsChain, coupled with the logs, provide a robust audit trail and invaluable documentation for future reference.
See OpsChain change details. You can see the list of changes in OpsChain using the OpsChain CLI.
You can also inspect the details of the change and the corresponding output logs using OpsChain CLI.
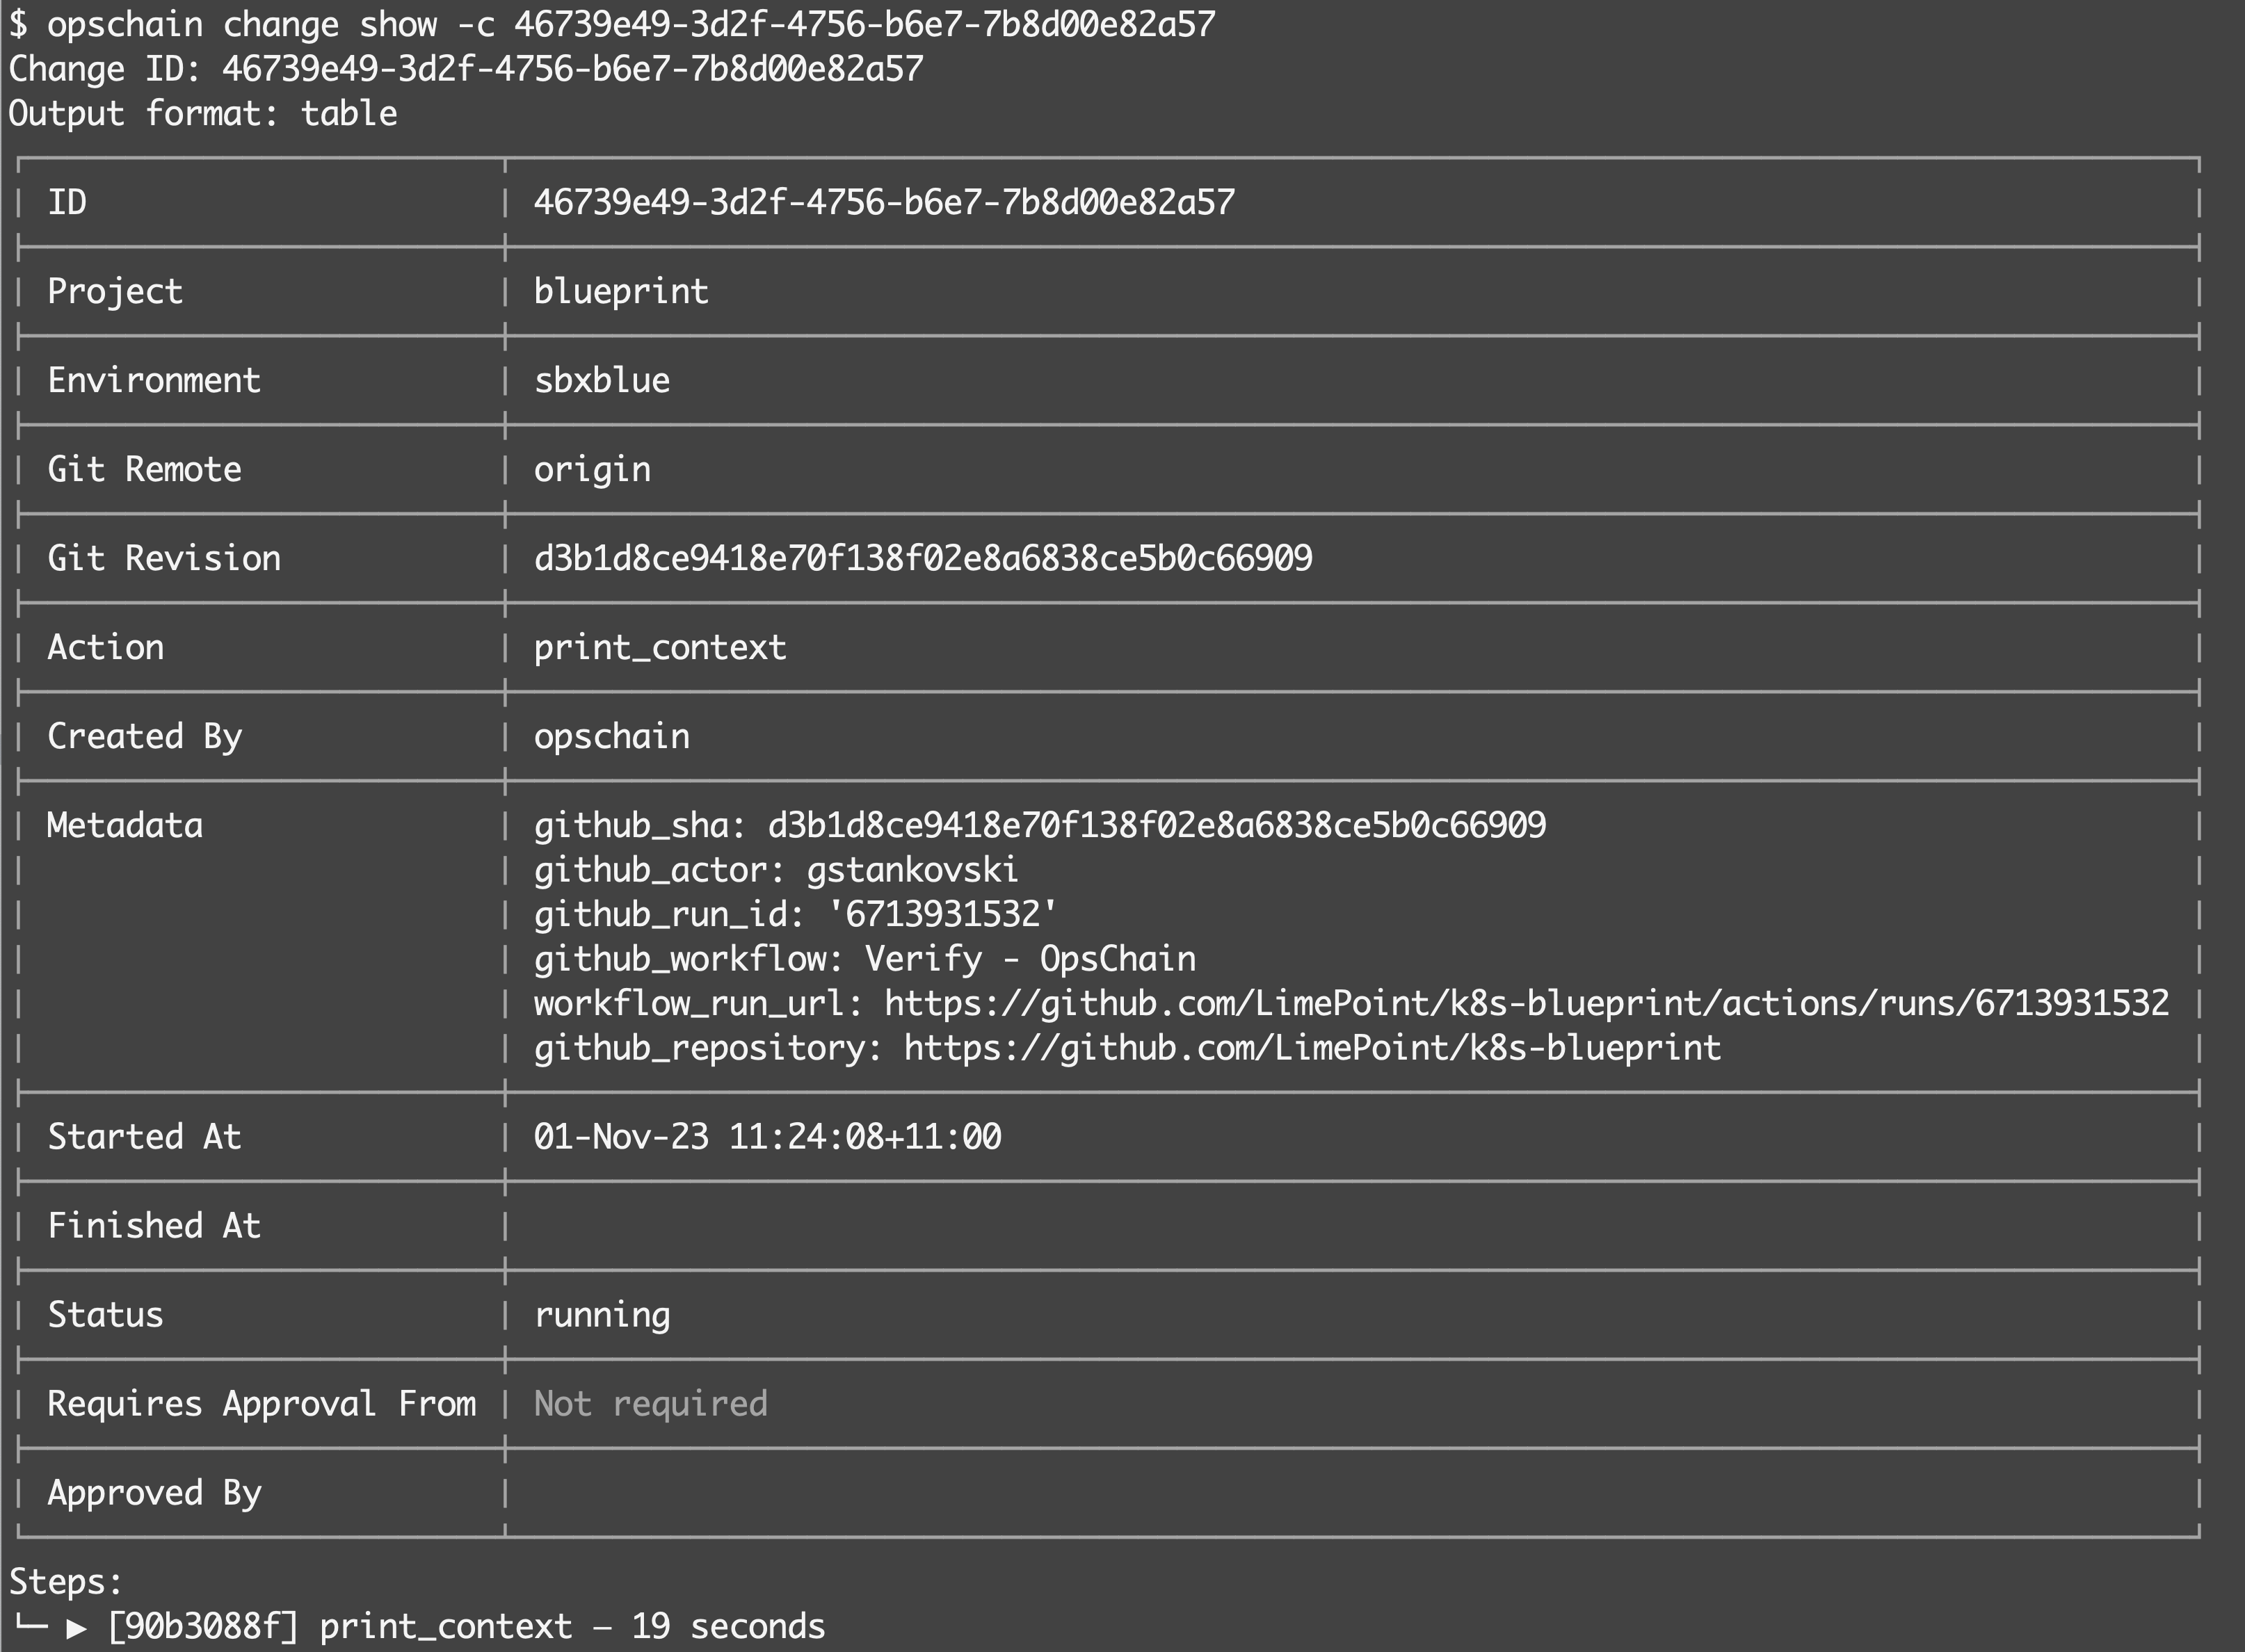
This log output is also stored in GitHub Actions log output for the Workflow, so is accessible from both OpsChain and GitHub Actions.
Learn more
Interested in deepening your understanding of OpsChain and GitHub Actions integration? Feel free to get in touch with us for more information. Our team is ready to assist and answer any questions. Contact us via email at info@opschain.io.